Ever tried ordering a replacement part for your office chair and realized you don’t know what half the components are called? You’re not alone. Office chairs are deceptively complex pieces of furniture, with dozens of interconnected parts working together to keep you comfortable and supported. Whether you’re troubleshooting a broken mechanism, upgrading worn components, or just curious about what makes your chair tick, understanding the anatomy of your office chair is the first step. This guide breaks down every major component, from the headrest down to the casters, so you can identify, maintain, or replace parts with confidence.
Table of Contents
ToggleKey Takeaways
- An office chair contains 15-20 major components organized into five main zones: upper support, seat assembly, armrests, control mechanisms, and base—understanding this anatomy makes repairs and upgrades straightforward.
- The gas lift cylinder, casters, and armrest pads are the three most common wear points that benefit from timely replacement to extend your office chair’s lifespan.
- Office chair parts diagrams vary by manufacturer and model, so always consult your chair’s manual or the manufacturer’s website to ensure you order the correct components.
- Most DIY office chair repairs like caster replacement, mesh panel fixes, and cushion upgrades are accessible to beginners and cost significantly less than purchasing a new chair.
- Ergonomic features like adjustable lumbar support, synchro-tilt mechanisms, and multi-dimensional armrests add comfort and complexity but also introduce more components that may eventually need maintenance.
- Matching the correct part specifications—such as caster type (hard for carpet, soft for hard floors) and gas cylinder class (Class 3 for standard use, Class 4 for heavier users)—ensures optimal chair performance and safety.
Understanding Your Office Chair’s Anatomy
Office chairs consist of roughly 15-20 major components, depending on the model and feature set. High-end ergonomic chairs pack in more adjustability, which means more parts. Budget task chairs keep it simple with fewer moving pieces.
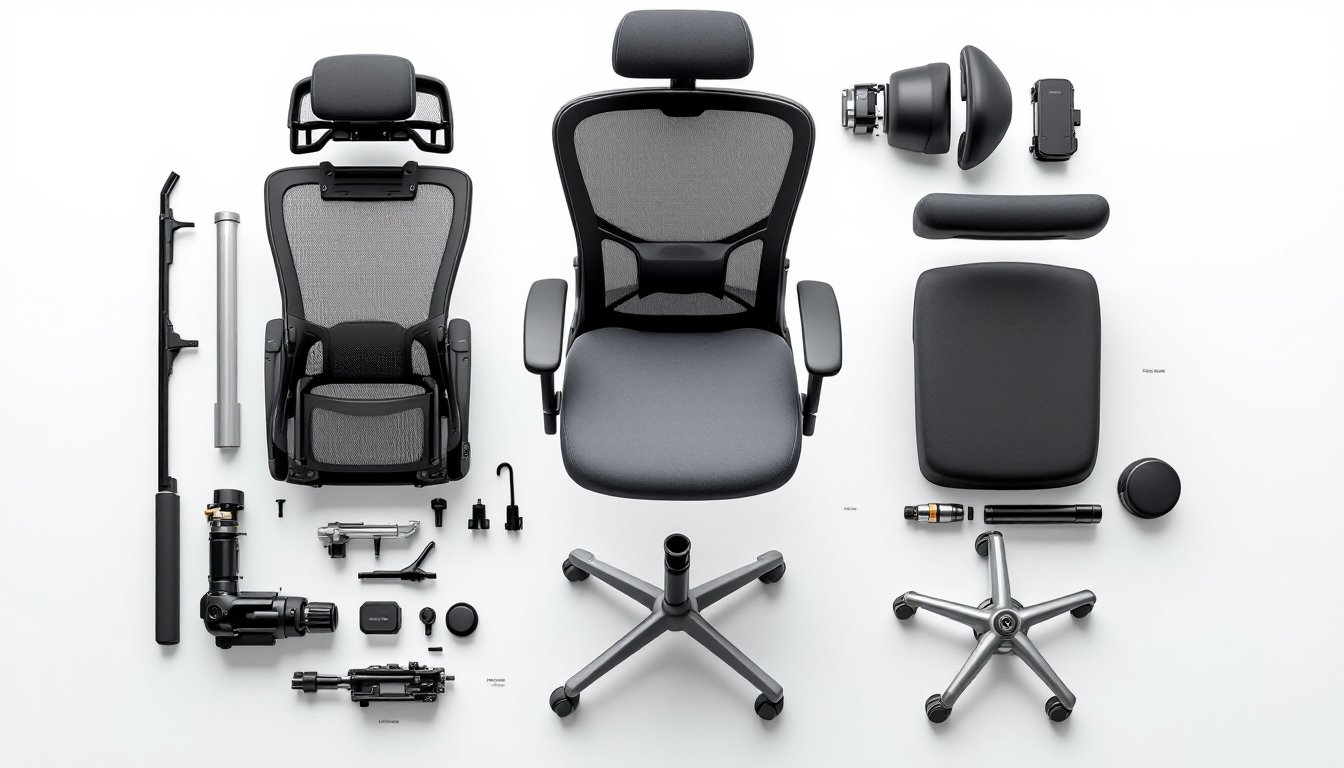
The typical office chair divides into five main zones: the upper support system (backrest, headrest, lumbar support), the seat assembly (pan, cushion, waterfall edge), the armrests, the control mechanism (tilt, height, tension), and the base assembly (gas cylinder, five-star base, casters). Each zone has its own set of parts that wear at different rates.
Most repairs or upgrades target three areas: the gas lift cylinder (when your chair won’t stay up), casters (when wheels get gunked up or crack), and armrest pads (which wear through from constant use). Knowing the proper names for these parts makes sourcing replacements infinitely easier.
One note before diving in: chair designs vary widely by manufacturer. A Herman Miller Aeron uses a completely different mechanism than a basic Amazon task chair. This guide covers standard components found across most mid-range office chairs. Always check your chair’s manual or manufacturer website for model-specific part diagrams.
Upper Chair Components: Backrest and Headrest Elements
The backrest frame forms the structural skeleton, usually molded plastic or a metal frame wrapped in mesh or upholstery. On mesh-back chairs, the mesh panel attaches to the frame via a tension system, either snap-fit clips or a border track that locks the mesh in place. Mesh can stretch or tear over time, but it’s often replaceable without swapping the entire backrest.
Lumbar support comes in two flavors: fixed (a built-in curve in the backrest) or adjustable (a separate pad or inflatable bladder). Adjustable lumbar systems use a height adjustment knob or pump mechanism mounted on the side or back of the chair. The lumbar pad itself slides up and down on a vertical track or J-channel built into the backrest frame.
The headrest (if present) typically mounts to the top of the backrest via a U-shaped bracket or twin-post system. Most headrests offer height and angle adjustment through a friction lock or set screw. The headrest pad is usually foam wrapped in fabric or leatherette, attached to a plastic or metal headrest shell.
Backrest tilt adjustment is controlled by a recline lock lever or multi-position tilt lock that engages notches in the mechanism below. Some chairs feature a backrest height adjustment, allowing you to raise or lower the entire back independently of the seat. This uses a ratchet system or gas spring similar to the main height adjustment.
Seat Pan and Cushion Assembly
The seat pan is the rigid platform that holds the cushion, typically molded plywood, stamped steel, or reinforced plastic. Standard seat pans measure 17-20 inches wide by 16-18 inches deep, though executive chairs run larger. The pan attaches to the control mechanism below via four mounting bolts in a standard pattern (though some manufacturers use proprietary spacing).
The seat cushion sits atop the pan, usually molded foam ranging from 2 to 4 inches thick. Density matters: 2.0-2.5 lb/ft³ density foam holds up better than the bargain-bin stuff. The cushion is wrapped in fabric, vinyl, or leather upholstery, which is stapled or glued to the underside of the pan. Replacing worn upholstery is doable but requires a staple gun and patience, or a trip to an upholstery shop.
The front edge of the seat often features a waterfall edge, a gentle downward curve that reduces pressure on the back of your thighs. Some ergonomic chairs add a seat angle adjustment (tilt the whole seat forward or back) via a separate lever that adjusts a pivot point on the seat pan. DIY enthusiasts looking for beginner-friendly upholstery projects can practice foam replacement and fabric wrapping techniques on older task chairs.
Seat depth adjustment (sliding the seat pan forward or back) uses a rail system underneath, locked in place by a release lever or paddle under the front of the seat. The rails are metal tracks with locking teeth or a friction lock. If your seat depth adjuster sticks, it usually needs cleaning and a shot of silicone spray, not replacement.
Armrest Types and Adjustment Mechanisms
Armrests break down into three components: the armrest pad (the cushioned surface your arm rests on), the armrest post (the vertical support), and the mounting bracket (which connects to the seat pan or backrest). The pad is usually polyurethane foam over a plastic or metal core, covered in vinyl or soft-touch plastic.
Fixed armrests bolt directly to the seat pan with no adjustment, simple and bulletproof, but not ergonomic. Height-adjustable armrests use a ratchet mechanism or friction collar on the post, released by a button or lever on the inside of the post. The post slides up and down in a sleeve or tube attached to the mounting bracket.
Multi-dimensional armrests (also called 4D armrests) add width adjustment (slide in/out), depth adjustment (slide forward/back), and pivot adjustment (angle the pads inward or outward). These use a plate system with locking levers or knobs for each axis of adjustment. The added complexity means more plastic parts that can crack or strip, especially the pivot joint and width adjustment slides.
Armrest pads take a beating and wear through first. Replacement pads are widely available, but make sure you match the mounting method, some snap on, others screw in from underneath. If the entire armrest assembly is shot, you’ll need to know whether your chair uses seat-mounted armrests (bolted to the side of the seat pan) or back-mounted armrests (attached to the backrest frame). The two aren’t interchangeable.
Control Mechanisms and Gas Lift Cylinder
The control mechanism (also called the tilt mechanism or synchro-tilt) is the metal assembly under the seat that controls tilt, recline, and height adjustment. It bolts to the underside of the seat pan and houses the tilt lock lever, tension adjustment knob, and the mounting socket for the gas cylinder.
Standard tilt mechanisms let the entire seat and backrest recline together. Synchro-tilt mechanisms recline the backrest at a 2:1 ratio to the seat (backrest tilts back twice as far), which keeps your feet planted. Knee-tilt mechanisms move the pivot point forward, so the front of the seat stays relatively level when you recline, better for shorter users.
The tension adjustment knob (usually under the right side of the seat) tightens or loosens a spring inside the mechanism. More tension = harder to recline. The spring itself is a coil spring or torsion bar rated for a specific weight range. If your chair won’t hold you upright or slams back with no resistance, the spring may be shot.
The gas lift cylinder (or gas spring) is the pneumatic column that raises and lowers the seat. It’s a sealed nitrogen-pressurized piston inside a chrome-plated steel tube. The cylinder inserts into the top socket of the mechanism and the center hole of the base below. Standard cylinders are Class 3 (rated for office use, up to 250 lbs) or Class 4 (heavy-duty, up to 350+ lbs). Those interested in disassembling or modifying chair components should exercise caution with gas cylinders, they’re under pressure and should never be punctured or heated.
When a gas cylinder fails (chair sinks slowly or won’t stay up), replacement is straightforward but requires a rubber mallet and a pipe wrench or cylinder removal tool to pop the old cylinder out of the base and mechanism. Wear safety goggles and gloves, occasionally a cylinder will vent residual pressure when removed.
Base, Casters, and Mobility Components
The five-star base (also called a spider base) is the foundation of the chair, typically nylon plastic (budget chairs) or aluminum (executive/ergonomic chairs). Five legs provide stability per ANSI/BIFMA standards, four-leg bases are rare and less stable. The base has a center hub with a tapered hole that grips the gas cylinder via friction (no bolts, just a Morse taper fit).
Casters (the wheels) insert into sockets at the end of each leg. Most office chairs use 2-inch diameter casters with a grip ring stem (a post with a grooved collar that friction-fits into the socket). Pulling a caster straight out with pliers removes it, no screws involved. Replacement casters come in two main types: hard casters (nylon or plastic, for carpet) and soft casters (rubber or polyurethane, for hard floors).
Rollerblade-style casters have become popular for hard floors, they use polyurethane wheels and rollerblade bearings for smooth, quiet rolling. Standard casters use a simple rivet axle: rollerblade casters use sealed bearings that last longer but cost more.
Some chairs add a caster brake system, either a pressure-activated brake (wheels lock when you stand up) or a manual foot-operated brake on the base. These use a lever arm that presses a brake pad against the wheel.
If your chair base is cracked (common with cheap plastic bases under heavy use), replacement is straightforward: flip the chair, remove the casters, pull the base off the cylinder (may need a mallet), slide the new base on. For tutorials on chair repair and modification, instructables.com offers numerous step-by-step guides covering caster replacement, base swaps, and upholstery work.
Conclusion
Understanding your office chair’s anatomy turns a mysterious piece of furniture into a collection of serviceable, replaceable parts. Most failures, sagging cushions, stuck adjustments, broken casters, are DIY-friendly repairs once you know what you’re looking at. Keep your chair’s model number handy when ordering parts, and don’t hesitate to upgrade components like comfortable office chairs use higher-grade casters or better foam. With the right parts and a bit of patience, that worn-out task chair has plenty of life left.